DX32A
Overview
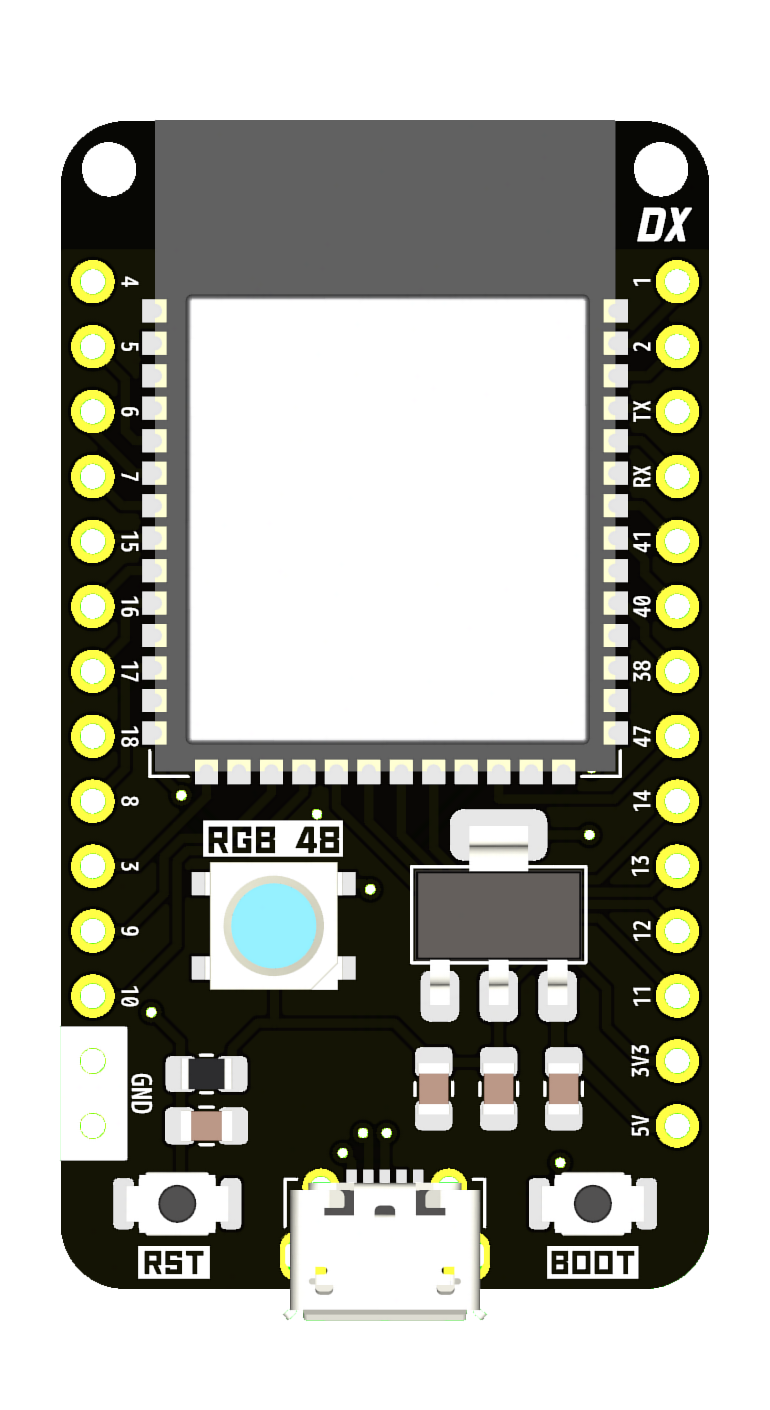
DX32A DELUXE dev board, the base DX32 model. Designed to be as simple as possible.
Features
- ESP32S3 N16R8 MCU
- WS2812b RGB LED
- SD Card slot
- breadboard compatible
Pinouts
(TBA)
Getting Started
Arduino IDE
Arduino IDE needs to be installed on your system (duh).
Download and install the ESP32 Arduino core, then go to Tools>Board, select ESP32>“ESP32S3 Dev Module”, and change the following settings:
- Flash Size -> “16MB (128Mb)”
- Partition scheme -> “16M Flash (2MB APP/12.5MB FATFS)” or “16M Flash (3MB APP/9.9MB FATFS)” depending on your application
- PSRAM -> “OPI PSRAM”
- Upload Mode -> “USB-OTG CDC (TinyUSB)”
- USB Mode -> You can pick between “Hardware CDC and JTAG” or “USB-OTG (TinyUSB)”
You can now use the DX32A with the Arduino IDE.
CircuitPython
Python, PIP and esptool need to be installed on your system (also, on Windows esptool is run just as “esptool” instead of “esptool.py”).
- While pressing the BOOT button of the DX32 board, connect the board to your computer to your computer via USB.
- Download the latest compatible CircuitPython .bin file, i chose this version meant for the YD-ESP32-S3 board, as its pin compatible with the DX32.
- Open a new terminal and go to the directory containing the circuitpython .bin file (eg:
cd ~/Downloads/) - Erase the flash memory of the board by running the command
esptool.py erase_flash(Warning: this will PERMANENTLY erase the memory of the board, if you have already flashed it before make sure your program is backed up, just in case) - Flash the board with Circuitpython by running
esptool.py write_flash 0x0 adafruit-circuitpython-{CIRCUITPYTHON-VERSION}.binReplace {CIRCUITPYTHON-VERSION} with the version of the file you downloaded (eg:esptool.py write_flash 0x0 adafruit-circuitpython-yd_esp32_s3_n16r8-en_US-9.2.0). - Once its done flashing, press the reset button, now after a while a CIRCUITPY drive will appear on your computer, where your python code will be stored and run from.
Read more about circuitpython here.
Tasmota
It took me quite a while to get this thing set up so i skipped through a lot of details.
Build custom Tasmota firmware:
- Use tasmocompiler to build a custom version of tasmota, follow these instructions to set it up
- Once its is set up open TasmoCompiler and press the DOWNLOAD SOURCE button, once its done press NEXT.
- Optionally, you can set up your wifi configuration, to skip just press NEXT.
- Select “ESP32 S3” as the board, and select the features you want to be included. I chose: Displays, Matter protocol, Rules, Timers, mDNS discovery, Berry scripting, SD card/LittleFS, Web interface, and WS2812 Leds. once youre done choosing the features you want press NEXT.
- Press NEXT one more time and select the Tasmota version and language. Now press COMPILE and wait for it to finish. When it finishes compiling download the FIRMWARE.BIN and FIRMWARE.FACTORY.BIN files.
You can now flash the initial firmware to the DX32 with esptool like so (this is only done ONCE per installation):
esptool.py write_flash 0x0 tasmota32s3.factory.bin
Once tasmota has been flashed and its WiFi connection has been set up, go to main menu>Firmware Upgrade, and upgrade tasmota using the FIRMWARE.BIN file (tasmota32s3.bin) that was compiled earlier.
You can use the following template for this board:
{"NAME":"DX32A DELUXE","GPIO":[0,1,1,1,1,1,1,1,1,608,640,1,1,1,1,1,1,1,1,0,0,672,0,0,0,0,0,1,736,1,1,704,1,1,6720,0,1,1376],"FLAG":0,"BASE":1}
Go to the Tasmota website for more information on how to get started with Tasmota.
History
This is the second board i made, my main inspiration was the ESP32 DevKit-C, i made it because most ESP32 boards weren’t breadboard compatible and that was starting to bother me.
This video by atomic14 was of huge help and another mayor inspiration for this project, i suggest you check out his channel https://www.youtube.com/watch?v=tQ0dL_9M1wI